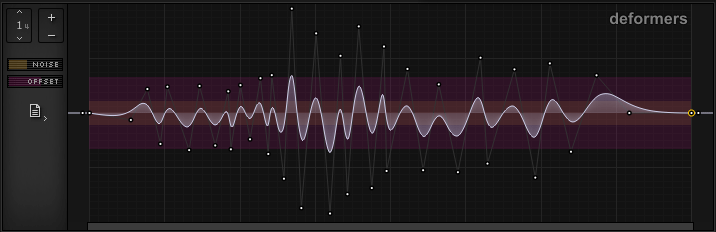
Some BackgroundYou'll notice that vertex paths over time are typically a straight line... With enough subdivisions and line segments, we could create virtually any shape, but this would greatly increases the complexity of the wireframe. Too much complexity makes editing cumbersome and hinders the creative process, so deformers are what solve this problem (among others). |
How to Use
|
Controls
|
GainIn the Vertex Params window, to the right of the deformer assignment dropdown box, there is a knob for changing the gain of the deformer of some vertex. This amplifies the effect of the deformer on that particular path. |
LimitationsDeformers do have some limitations - particularly that they cannot morph. When you assign a deformer to a vertex, it's shared between all its 8 morphing states. That is mostly so the deformer can fulfil its function as the efficient and simple way to add detail. That said, because curve sharpness is a morphable parameter, the gain of some deformers can change across morphing ranges. And naturally the position of the start and end points can move around. If you really need to make a complex path that morphs, you need to use the axe tool and chop the path into smaller segments, each of which can transform on its own. |

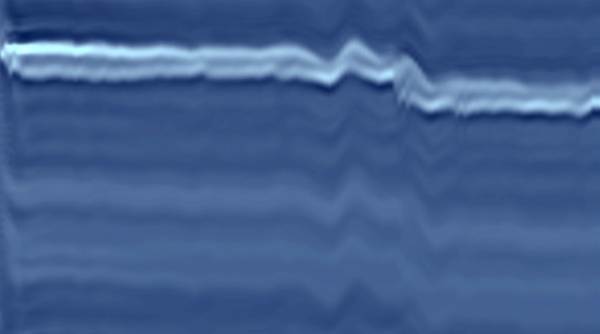 But if you observe the waveshape progression of a natural sound,
most likely you'll see that the patterns are not straight, but rather irregular
or chaotic.
But if you observe the waveshape progression of a natural sound,
most likely you'll see that the patterns are not straight, but rather irregular
or chaotic.
|
Applications |

Noise OscillatorThe noise parameter at the deformer controls area adds noise to the path. If you leave the path as the default line, crank up the noise and this will serve as a noise oscillator by assigning it to the amp-vs-phase slot of a waveshape curve point - effectively making the noise span between curve nodes. A similar deformer assigned to a phase-domain curve can have the effect of adding breathiness to the tone. Something to note is that if you assign the noise deformer to multiple places, they will all have the same noise pattern and move in unison. If you want another noise pattern, say for example to create stereo noise, add another deformer channel with the same noise level - it will have a new noise seed. |

ChaosLots of sounds have a noisier attack than the rest of the tone, particularly in real instruments - this is because there is usually some 'warm up' before the oscillating parts of an instrument get into sync with eachother. This is an important and recognizable characteristic of each instrument. And generally, natural tones are not squeaky clean like synthetic sounds. A bit of dirt here and there helps the illusion. With a deformer path you can simulate this chaos by making a rough path and assigning it to a vertex path's x- or y-parameter. |

Intricate Shapes / FiltersA lot of times you might want to start synthesis with a super complex waveshape that doesn't need to morph. It's a lot more efficient to use a deformer for this because Cycle doesn't have to recalculate the curve every cycle of the tone. In the Vertex Params panel, assign the deformer to the amp-vs-phase parameter of a vertex to replace part of the curve with this shape. |
Gain DeformedA somewhat obscure feature is that when a deformer is assigned as a component of another curve (an amp-vs-phase assignment), the curve sharpness parameter - which would have been unused - now acts as a gain multiplier of the deformer. You could be thinking, there's already a gain knob, why do we need another? Good question! Since you can also add a deformer to the sharpness parameter (now behaving as gain), in effect the deformer gain can be automated. This enables some really great sonic effects, for instance in the spectrum filter you can make a curve behave like a wah-wah pedal. Plus, the sharpness parameter can morph, and thus so too can the deformer gain. |